Table of Contents
- Background
- It's as easy as 3-2-1
- My strategy
- Technologies
- Backup Setup
- Replication Setup
- Monitoring
- Networking
- Acknowledgements
Background #
Recently I've noticed an uptick in the engagement found within the self-hosting community, so I've decided to start a series of posts that look into why and how I handle self-hosting. Today's post will focus on data storage and will look into some of the options available when it comes to data backups.
Data storage is hard. Data backup is even harder. Therefore, I spent some time recently to re-evaluate my backup strategy. Prior to deciding to roll my own backup solution, I would generally backup files to Google Drive as my main "backup" mechanism. This was quite a shameful setup but gave me a good amount of storage with easy access to all of my data. I used the Enterprise Workspace plan which gave me access to as much storage as I needed, but Google soon changed their offering. I was using ~9TB of storage at that time, so once they removed the "as much as you need" provision, I had to use 2 users worth of pooled storage. This amounts to ~$40/mo, which is still not terrible for data storage that is fairly reliable.
It's as easy as 3-2-1 #
When architecting my new backup strategy, I decided it was time for an upgrade. Generally, the 3-2-1 data backup method is recommended. The idea with this strategy is you maintain 3 different copies of your data, with 2 copies stored in two different locations/media, and 1 copy stored at an offsite location. This setup is pretty easy to achieve and provides pretty good fault-tolerance and disaster recovery. It also ensures that your data is protected when the unthinkable happens.
1|--------|    |---------|    |---------|
2|   3    | -> | 2 Media | -> |    1    |
3| Copies |    |  Types  |    | Offsite |
4|--------|    |---------|    |---------|
Achieving this backup strategy isn't particularly difficult to do. A simple setup with this scheme could be done with the following:
- Primary data source (a laptop)
- A backup of the primary data source (a usb or external hard drive)
- A backup of the primary data source (a cloud backup)
With a setup like this, we end up with 3 copies of our data. We have at least 2 different types of media (external hard drive and cloud storage), and one copy offsite (in the cloud). Therefore, we should have fairly decent data redundancy.
My strategy #
Based on the above and for my own purposes, I decided a viable backup process would involve the following:
- Primary data source (laptops, desktops, phones, etc)
- A backup of the primary data to the NAS at home
- A backup of the NAS at home to a similar NAS offsite
- A backup of the NAS to the cloud
This scheme gives me a decent amount of flexibility and options for backing up my data, as well as generally follows the 3-2-1 rule I described above. The main benefit of using this method is that each device I backup only needs to keep track of a single backup target. That backup target then can be easily backed up to a secondary target without the primary device needing to have any intervention. In the event the backup target is destroyed, it can be replaced by the secondary target, and the secondary target replaced by a new device with all of the data replicated to it. This ensures that in the event a device is lost, data is still well protected and devices can be replaced easily with minimal downtime since we can promote devices to take each other's place as needed.
Technologies #
Primary data sources would be backed up using the following:
- Borg (via Borgmatic or Vorta) for linux/macos hosts using
- rsync for random hosts/data that don't need dedupe and other Borg niceties
- samba for macOS/Windows
The backup targets would be machines running Ubuntu Server 22.04 LTS. All backup data would be stored in ZFS, which would ultimately make our desired scheme trivial to implement. They would have the following configuration:
- 32gb of ram
- 8 core cpu, 3.5ghz base clock
- 4 18tb HDDs using ZFS and in a single zpool
- A small HDD for OS install
For the base OS, the default installation parameters were chosen. Regarding the actual backup storage devices (the 18tb HDDs), a zpool was created that consisted of two mirrored vdevs, with each mirror containing 2 disks. This strategy provides decent redundancy in the case that a disk fails (we can lose up to one disk in each vdev), while also allowing us to grow the pool in the future. If the pool is ever running low on data, we can easily add another vdev of 2 disks to increase the capacity. This method does result in our storage pool having capacity of half the total disk space we have available (18tb * 2 vdevs = 36tb).
Over using zraid, this option gives us fantastic performance, good scalability, and ease of management.
The choice of ZFS simplifies our NAS backups, as we can utilize the ability of ZFS to send and receive snapshots to send backups of our data. This is a huge benefit as it simplifies the backup process tremendously. Our systems are large enough that the overhead of running ZFS itself should be neglible, and we can reap huge benefits in our ability to easily replicate our data. Snapshots don't cost us anything to use (a huge benefit due to the fact that ZFS is CoW, copy-on-write), so we can feel safe knowing that we can use them.
Backup Setup #
ZFS Setup #
The setup process for each NAS was pretty much the same and can be summarized by the following:
- Install ZFS on Linux and setup the zpool named
backup:
 1# Install ZoL
 2apt-get update && apt-get install zfsutils-linux -y
 3
 4# Get the list of devices by their ids to ensure
 5# they are found correctly when the pool is imported:
 6ls /dev/disk/by-id/*
 7
 8# Create the mirrored pool with the first vdev
 9zpool create -o ashift={ashift} backup mirror \
10  /dev/disk/by-id/{device_id_here} \
11  /dev/disk/by-id/{device_id_here}
12
13# Add another vdev to the pool (can be done as many times as we want, expanding the pool)
14zpool add -o ashift={ashift} backup mirror \
15  /dev/disk/by-id/{device_id_here} \
16  /dev/disk/by-id/{device_id_here}
17
18# Enable compression for the pool (if desired)
19zfs set compression=on backup
20
21# Disable mounting for the pool (if desired)
22zfs set canmount=off backup
NOTE: I decided to use
compression=on, but you can tune this to your own preferences. I also decided not to encrypt the entire zpool, so I could control this per-dataset (and therefore), have different encryption keys per dataset. You should modify these snippets how you want (including) changing variables to what you want them to be.
- Setup the different datasets you want:
 1# Create an encrypted dataset for borg
 2zfs create -o encryption=aes-256-gcm \
 3  -o keylocation=prompt \
 4  -o keyformat=passphrase \
 5  backup/borg
 6
 7# Create an encrypted dataset for misc
 8zfs create -o encryption=aes-256-gcm \
 9  -o keylocation=prompt \
10  -o keyformat=passphrase \
11  backup/misc
12
13# Setup a dataset for samba with some settings we need
14# We disable access times, inherit acls, disable unneeded
15# permissions, and set extended attributes to be stored more
16# optimally for performance. I also set a quota for samba
17# and the descendant data sets to 5T.
18# The quota can also be changed later or switched to `refquota`
19# which does not include snapshot sizes.
20zfs create -o encryption=aes-256-gcm
21  -o keylocation=prompt
22  -o keyformat=passphrase
23  -o atime=off \
24  -o dnodesize=auto \
25  -o aclinherit=passthrough \
26  -o acltype=posixacl \
27  -o xattr=sa \
28  -o exec=off \
29  -o devices=off \
30  -o setuid=off \
31  -o canmount=on \
32  -o quota=5T \
33  backup/samba
34
35# Setup a dataset for windows and inherit the samba configs
36# (but set a different encryption key)
37zfs create -o encryption=aes-256-gcm \
38  -o keylocation=prompt \
39  -o keyformat=passphrase backup/samba/windows
40
41# Setup a dataset for macos and inherit the samba configs
42# (but set a different encryption key)
43zfs create -o encryption=aes-256-gcm \
44  -o keylocation=prompt \
45  -o keyformat=passphrase backup/samba/macos
46
47# Setup a dataset for public use and inherit the samba configs
48# (but set a different encryption key)
49zfs create -o encryption=aes-256-gcm \
50  -o keylocation=prompt \
51  -o keyformat=passphrase backup/samba/public
After running the above, we can see the status of our pool:
1# Get the zpool status
2zpool status
 1  pool: backup
 2 state: ONLINE
 3  scan: scrub repaired 0B in 08:40:45 with 0 errors on Sun Mar 10 09:04:46 2024
 4config:
 5
 6        NAME                                  STATE     READ WRITE CKSUM
 7        backup                                ONLINE       0     0     0
 8          mirror-0                            ONLINE       0     0     0
 9            {device_id_here}                  ONLINE       0     0     0
10            {device_id_here}                  ONLINE       0     0     0
11          mirror-1                            ONLINE       0     0     0
12            {device_id_here}                  ONLINE       0     0     0
13            {device_id_here}                  ONLINE       0     0     0
14
15errors: No known data errors
And get our datasets:
1# List our datasets
2zfs list -t filesystem
1NAME                   USED  AVAIL     REFER  MOUNTPOINT
2backup                   0K  34.0T        0K  /backup
3backup/borg              0K  34.0T        0K  /backup/borg
4backup/misc              0K  34.0T        0K  /backup/misc
5backup/samba             0K  5.00T        0K  /backup/samba
6backup/samba/macos       0K  5.00T        0K  /backup/samba/macos
7backup/samba/public      0K  5.00T        0K  /backup/samba/public
8backup/samba/windows     0K  5.00T        0K  /backup/samba/windows
Software Setup #
For software that truly isn't necessary to run on the host, I'll be utilizing Docker and Docker Compose for deployment and software management. I've decided to do this is it makes it easy for me to manage configuration state and track changes to the deployment strategy as code. Also, this ensures that any software I run on this host will continue to function even if I move to a different host OS (for example, if I decide to swith to Debian or Fedora). You could also use Podman if you'd like for this step.
NOTE: The below settings have a user and password set with
${USER}and${PASSWORD}respectively. This is not an environment variable. You need to modify these snippets yourself in order to set it up how you want it.
SSH Setup (borg and rsync) #
Borg #
I utilize the nold360/borgserver image. The image is easy to
configure, and assumes I have the local directories ./sshkeys and ./data to store each piece of data
accordingly. User ssh keys are placed in ./sshkeys/clients/, each being the name of the borg repository that key
will have access to. It's important to note that this file can only contain a single key. Setting BORG_APPEND_ONLY
disables data deletion until the BORG_ADMIN runs a prune operation. Here's the compose file:
 1version: "3.8"
 2services:
 3  server:
 4    image: nold360/borgserver:bookworm
 5    volumes:
 6      - ./sshkeys:/sshkeys
 7      - ./data:/backup
 8    ports:
 9      - "22222:22"
10    environment:
11      BORG_SERVE_ARGS: "--progress --debug"
12      BORG_APPEND_ONLY: "yes"
13      # BORG_ADMIN: "${USER}"
14    restart: always
I keep the compose file at the root of the /backup/borg dataset. This allows my compose setup to also be included
as part of snapshots.
rsync #
rsync access is done directly using the host in this situation. I previously used a docker image for this, but decided it was unnecessary.
Samba Setup #
I utilize the ghcr.io/vremenar/samba image,
which is based on dperson/samba but updates the samba and
alpine versions. I then utilize a custom samba config for setting Time Machine shares, and the default
configuration provided by the image. Here's the compose file:
 1version: "3.8"
 2services:
 3  server:
 4    image: ghcr.io/vremenar/samba:latest
 5    volumes:
 6      - ./samba.conf:/samba.conf:ro
 7      - ./macos:/macos
 8      - ./public:/public
 9      - ./windows:/windows
10    ports:
11      - "139:139"
12      - "445:445"
13    command: |
14      -p -n
15      -g "log level = 2"
16      -I /samba.conf
17      -u "${USER};${PASSWORD}"
18      -s "public;/public;yes;yes;yes;all;none;${USER}"
19      -s "windows-shared;/windows/shared;yes;no;no;all"
20      -s "macos-shared;/macos/shared;yes;no;no;all"
21    restart: always
This configuration broadcasts 3 shares by default:
- public, mapped to the
/publicvolume. It is browseable (discoverable), is read only, and has guest access enabled. All users have access to view the share, and there are no admins on the share. The only user that can write files to the share is ${USER}. I'll utilize this share for storing public assets that I might need on my network (installation scripts, shared apps, etc). - windows-shared, mapped to
/windows/shared. This is a shared mount for windows machines on the network. All users have access to it and it is browseable. - macos-shared, mapped to
/macos/shared. This is a shared mount for macOS machines on the network. All users have access to it and it is browseable.
There is nothing preventing mac or windows machines from accessing the shared mounts, but this allows me to set attributes per-share if needed in the future (such as shadow files and versions in windows). Also, more separation is not a bad thing in this situation.
For Time Machine, a custom samba.conf is utilized. the contents are as follows:
 1[${USER}-timemachine]
 2    comment = ${USER}'s Time Machine
 3    path = /macos/timemachine/${USER}
 4    browseable = no
 5    writeable = yes
 6    create mask = 0600
 7    directory mask = 0700
 8    spotlight = yes
 9    vfs objects = catia fruit streams_xattr
10    fruit:aapl = yes
11    fruit:time machine = yes
12    valid users = ${USER}
Here we create a non-browseable share that has a single valid user. We also set the proper vfs objects
settings and mark the share as Time Machine specific.
I keep the compose file and config at the root of the /backup/samba dataset. This allows my compose setup to also be included
as part of snapshots like the above.
It's important that you set the right permissions on the path you use within the extra samba.conf (like in my situation).
You need to make sure the directory exists in your zfs dataset and has the right permissions so the samba container can
access it. For me, I ran the following:
1# Create the path on the ZFS dataset
2mkdir -p macos/timemachine/${USER}
3
4# Set permissions on the path to the smbuser and smb group from within the container
5# If you deploy it with a different method than me, you can use `id smbuser` to get
6# the correct uid/gid to use.
7chown -R 100:101 macos/timemachine/${USER}
Windows can also make use of our zfs snapshots if we setup the shadow_copy2 vfs objects option on our windows mount.
This would look something like this:
 1[windows-shared]
 2   path = /windows/shared
 3   browsable = yes
 4   read only = no
 5   guest ok = no
 6   veto files = /.apdisk/.DS_Store/.TemporaryItems/.Trashes/desktop.ini/ehthumbs.db/Network Trash Folder/Temporary Items/Thumbs.db/
 7   delete veto files = yes
 8   vfs objects = shadow_copy2
 9   shadow:snapdir = ../.zfs/snapshot
10   shadow:sort = desc
11   shadow:format = %Y-%m-%dT%H:%M:%S-%Z
This makes use of zfs' ../.zfs/snapshot directory in our dataset. However, the path we are using has to be a snapshottable dataset
in order for this directory to exist. You can utilize shadow:snapdirseverywhere = yes to includes snapshots from parent directories.
Just ensure to set shadow:crossmountpoints according to your setup (in my case no should be sufficient).
Replication Setup #
Now that our NAS and different methods of getting data onto our NAS are setup, it's time to setup replication to ensure our NAS is backed up to a secondary location (the last part of our 3-2-1 solution). To do this, we'll make use of ZFS Snapshots, which is an easy way to take a snapshot of the current state of a dataset.
ZFS Snapshots #
Because ZFS is a CoW (copy-on-write) filesystem, snapshots don't utilize any extra data and are immutable. Snapshots can also be sent over a pipe (like with SSH) so they are portable. If desired, snapshots could even be written to file. The other powerful utility of snapshots is that we can utilize them incrementally, meaning we only send the changes to a dataset each backup cycle instead of the entire dataset.
In order to take a snapshot, we utilize the zfs snapshot command like so:
1# Take a snapshot of the main backup/samba dataset. The snapshot name is `initial`.
2# Because we use `-r`, this will also take a snapshot of all child datasets
3zfs snapshot -r backup/samba@initial
After running this command, we can show our snapshots with the following command:
1# List all items from our zpool that come from backup/samba
2zfs list -t all -r backup/samba
1NAME                           USED  AVAIL     REFER  MOUNTPOINT
2backup/samba                     0K  5.00T        0K  /backup/samba
3backup/samba@initial             0K      -        0K  -
4backup/samba/macos               0K  5.00T        0K  /backup/samba/macos
5backup/samba/macos@initial       0K      -        0K  -
6backup/samba/public              0K  5.00T        0K  /backup/samba/public
7backup/samba/public@initial      0K      -        0K  -
8backup/samba/windows             0K  5.00T        0K  /backup/samba/windows
9backup/samba/windows@initial     0K      -        0K  -
If we have another zfs machine we can send our snapshots to, we can run something like so:
1# Send the snapshots verbosely (-v) under `backup/samba` with the name `initial` recursively (-R)
2# raw (-w), meaning as the encrypted data on disk. Pipe it through `pv` (pipeviewer to see transfer stats)
3# and receive it on the server named `backup1`, allowing for interruption (-s), also with verbose info (-v)
4# into the dataset named backup/samba.
5zfs send -vRw backup/samba@initial | pv | ssh backup1 zfs recv -s -v backup/samba
On backup1, we can see the snapshots and datasets like above:
1NAME                           USED  AVAIL     REFER  MOUNTPOINT
2backup/samba                     0K  5.00T        0K  /backup/samba
3backup/samba@initial             0K      -        0K  -
4backup/samba/macos               0K  5.00T        0K  /backup/samba/macos
5backup/samba/macos@initial       0K      -        0K  -
6backup/samba/public              0K  5.00T        0K  /backup/samba/public
7backup/samba/public@initial      0K      -        0K  -
8backup/samba/windows             0K  5.00T        0K  /backup/samba/windows
9backup/samba/windows@initial     0K      -        0K  -
The difference is, our datasets are not mounted in each mountpoint. You can see this by running:
1# Use df to see mounted filesystems
2df -h
In order to mount them, we do the following:
1# Mount all zfs mounts, and load the encryption keys
2zfs mount -al
For each filesystem, you will be asked for the passphrase that was used when the dataset was created. This means we can send our encrypted filesystems anywhere (even to a file) and not be worried that our data can be accessed. This is great for all kinds of reasons and opens up many possibilities. For example, a friend and I can be each other's offsite backup without being worried of them accessing my data. You can also save snapshots to a file and store them on a blob storage backend or some storage box in the cloud.
Filesystems can be unmounted using the following:
1# Unmount all zfs mounts, and unload the encryption keys
2zfs unmount -au
If we take another snapshot on backup0 and want to send it to backup1 incrementally, we can do it like so:
1# Take the snapshot
2zfs snapshot -r backup/samba@next
3
4# Send snapshots between `initial` and `next` to `backup1`
5zfs send -vRwI backup/samba@initial backup/samba@next | pv | ssh backup1 zfs recv -s -v backup/samba
Reconciliation #
If you see an error like this:
1send from @initial to backup/samba@next estimated size is 77.1K
2send from @initial to backup/samba/public@next estimated size is 43.1K
3send from @initial to backup/samba/macos@next estimated size is 112K
4send from @initial to backup/samba/windows@next estimated size is 40.6K
5total estimated size is 273K
6receiving incremental stream of backup/samba@next into backup/samba@next
7cannot receive incremental stream: destination backup/samba has been modified
8since most recent snapshot
986.8KiB 0:00:00 [ 164KiB/s] [<=>                                             ]
You need to reset the state of the receiving pool to the snapshot that was previously sent. You can do that like so:
1# List snapshots (-t) of the dataset (and children, -r), without headers (-H), and roll it back
2# This assumes there is only one snapshot per dataset on the machine, your mileage may vary.
3zfs list -Hrt snapshot backup/samba | awk '{print $1}' | xargs -I{} zfs rollback {}
You can avoid this by setting each dataset on the remote backup side to readonly like so:
1zfs set readonly=on backup/samba
Automated backups with send and receive #
Now that we have all of the tools we need to make backups a reality, let's go ahead and set up an automated way to handle backups.
We will be using backup0 as our main NAS and backup1 as our secondary NAS
First, let's create a user on our backup1 for us to receive ssh connections to:
1# Use adduser to create a user, we can use the defaults for everything.
2adduser zfsbackup
Next, let's create a SSH key on backup0 which will be used to access the user:
1# Generate an ed25519 key. Save it to a file like `~/.ssh/id_ed25519_zfsbackup`
2# You may choose to have a key per dataset as we can limit which dataset the ssh
3# process has access to with `authorized_keys`.
4ssh-keygen -t ed25519
On backup1, allow zfsbackup user access to the pool (or specific datasets) we want with only create, mount, and receive permissions:
1# Limit our blast radius by only allowing zfsbackup to create, mount and receive files. Don't allow it to destroy or delete data.
2zfs allow -u zfsbackup create,mount,receive backup
Also on backup1, let's setup the authorized_keys file in /home/zfsbackup/.ssh/authorized_keys with the following:
1command="/opt/backup/ssh.sh backup/samba",no-port-forwarding,no-X11-forwarding,no-agent-forwarding,no-pty ssh-ed25519 .... root@backup0
This file only allows the zfsbackup user to run a single command (/opt/backup/ssh.sh backup/samba ...), which is a wrapper around zfs recv and
also allows us to get the latest snapshot on the host, which is how we will only incrementally send the snapshots that backup1 doesn't know
about. This allows us to limit the types of commands the ssh user can run.
Next, the contents of the shell script at /opt/backup/ssh.sh is as follows:
 1#!/bin/bash
 2
 3# Set the dataset name the user can access
 4DATASET_NAME="${1:?Dataset not provided}"
 5
 6# Go through the exec command that was sent via ssh
 7case "$SSH_ORIGINAL_COMMAND" in
 8  recv)
 9    # Receive the snapshots into the dataset
10    zfs recv -v "${DATASET_NAME}"
11    ;;
12  latest)
13    # List the most recent snapshot in the dataset
14    zfs list -t snapshot -o name -s creation -H "${DATASET_NAME}" | tail -n 1
15    ;;
16  *)
17    echo "unknown command $DATASET_NAME"
18    exit 1
19    ;;
20esac
This prevents the user from making queries about any datasets other than the one pinned in the authorized_keys file. This can be easily changed
to allow the user access to any of the datasets in a pool like so:
 1#!/bin/bash
 2
 3# Set the dataset name/parent the user has access to
 4DATASET_NAME="${1:?Dataset or pool not provided}"
 5
 6# Set the original command as args
 7set -- $SSH_ORIGINAL_COMMAND
 8
 9# Pull the dataset the user wanted to manage
10REAL_DATASET="${2:-$DATASET_NAME}"
11
12# Check if the dataset is a child of the allowed parent
13if [[ $REAL_DATASET != $DATASET_NAME* ]]; then
14  echo "no permissions for dataset $REAL_DATASET"
15  exit 1
16fi
17
18# Check the command the user wants to run
19case "$1" in
20  recv)
21    # Receive the snapshots
22    zfs recv -v "${REAL_DATASET}"
23    ;;
24  latest)
25    # List the latest snapshot for the dataset
26    zfs list -t snapshot -o name -s creation -H "${REAL_DATASET}" | tail -n 1
27    ;;
28  *)
29    echo "unknown command $1"
30    exit 1
31    ;;
32esac
Put this script somewhere owned by root but accessible to other users (and executable). I chose /opt/backup/ssh.sh. The directory
and file have permissions 0755 set on it.
NOTE: Use these scripts at your own risk. I have not configured them to handle every possible corner case.
We can test that our script is working properly by querying for the latest snapshot:
1ssh -i .ssh/id_ed25519_zfsbackup zfsbackup@backup1 latest
1backup/samba@next
Now let's setup our cronjob to actually send our updates. On backup0, we create a file at /etc/cron.daily/backup with the same
permissions 0755 set. I chose to use the run-parts cron setup, but you can choose to do this however you'd like.
The content of the file looks like this:
 1#!/bin/bash
 2
 3# Set our path
 4PATH=/usr/local/sbin:/usr/local/bin:/usr/sbin:/usr/bin:/sbin:/bin:/usr/games:/usr/local/games:/snap/bin
 5
 6# Safe bash defaults
 7set -euo pipefail
 8
 9# Create our snapshot name based on todays iso date
10SNAPSHOT_NAME="$(date +"%Y-%m-%dT%H:%M:%S-%Z")"
11
12# Iterate through a list of datasets, could just as easily loop through the output of zfs list -t filesystem
13for DATASET in samba; do
14  # Get the local latest snapshot fpr diffing
15  LOCAL_LATEST="$(zfs list -t snapshot -o name -s creation -H "backup/${DATASET}" | tail -n 1)"
16
17  # Check if the local latest snapshot is different than the current state of the filesystem (or if FORCE_BACKUP is set)
18  if [ "$(zfs diff "${LOCAL_LATEST}" | wc -l)" = "0" ] && [ -z ${FORCE_BACKUP:-} ]; then
19    echo "Skipping backup of backup/${DATASET} as no files have changed."
20    continue
21  fi
22
23  # Take the snapshot
24  echo "Taking snapshot backup/${DATASET}@${SNAPSHOT_NAME}"
25  zfs snapshot -r "backup/${DATASET}@${SNAPSHOT_NAME}"
26
27  # Get the latest snapshot on the remote side
28  LATEST_SNAPSHOT="$(ssh -i "/root/.ssh/id_ed25519_zfsbackup" zfsbackup@backup1 latest)"
29
30  # Send incremental snapshot between the latest on the remote and the one we just took
31  echo "Sending incremental snapshots between ${LATEST_SNAPSHOT} backup/${DATASET}@${SNAPSHOT_NAME}"
32  zfs send -RwI "${LATEST_SNAPSHOT}" "backup/${DATASET}@${SNAPSHOT_NAME}" | pv | ssh -i "/root/.ssh/id_ed25519_zfsbackup" zfsbackup@backup1 recv
33done
You can test the cron backup by using:
1# Run the script
2/etc/cron.daily/backup
3
4# If the snapshot is new, force send a backup
5FORCE_BACKUP=true /etc/cron.daily/backup
You can also test it using run-parts:
1# Trigger run-parts for the daily component
2run-parts /etc/cron.daily
Cloud Backups #
Use rsync.net and send and receive as if you built a second NAS like above!
Or, send snapshots as a blob to BackBlaze B2. For example:
1# Send a snapshot incrementally and upload it to b2
2zfs send -vRwI backup/samba@initial backup/samba@next | pv | b2 upload-unbound-stream zfs-backups - backup-samba-initial-backup-samba-next
And receive the snapshot like so:
1# Receive a snapshot from b2
2b2 download-file-by-name zfs-backups backup-samba-initial-backup-samba-next - | pv | zfs recv -s -v backup/samba
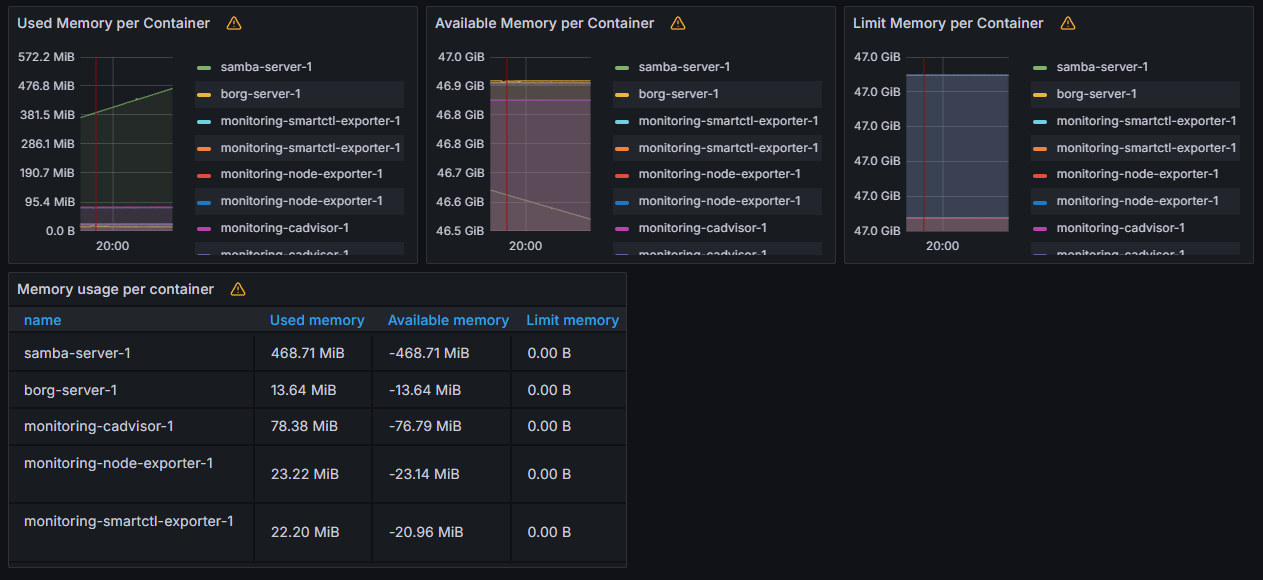
Monitoring #
For monitoring my systems, I use Prometheus and Grafana exclusively. I won't go into setting up those two services, but I use the following docker-compose.yml for these deployments:
 1version: "3.8"
 2
 3services:
 4  node-exporter:
 5    image: quay.io/prometheus/node-exporter:latest
 6    restart: always
 7    volumes:
 8      - /:/host:ro,rslave
 9    network_mode: host
10    pid: host
11    command:
12      - --path.rootfs=/host
13  cadvisor:
14    image: gcr.io/cadvisor/cadvisor:latest
15    restart: always
16    volumes:
17      - /:/rootfs:ro
18      - /var/run:/var/run:ro
19      - /sys:/sys:ro
20      - /var/lib/docker/:/var/lib/docker:ro
21      - /dev/disk/:/dev/disk:ro
22    ports:
23      - 9080:8080
24    privileged: true
25    devices:
26      - /dev/kmsg
27  smartctl-exporter:
28    image: prometheuscommunity/smartctl-exporter:latest
29    restart: always
30    ports:
31      - 9633:9633
32    privileged: true
33    user: root
This compose file lives in /backup/misc/monitoring, so it is also retained as part of my backups.
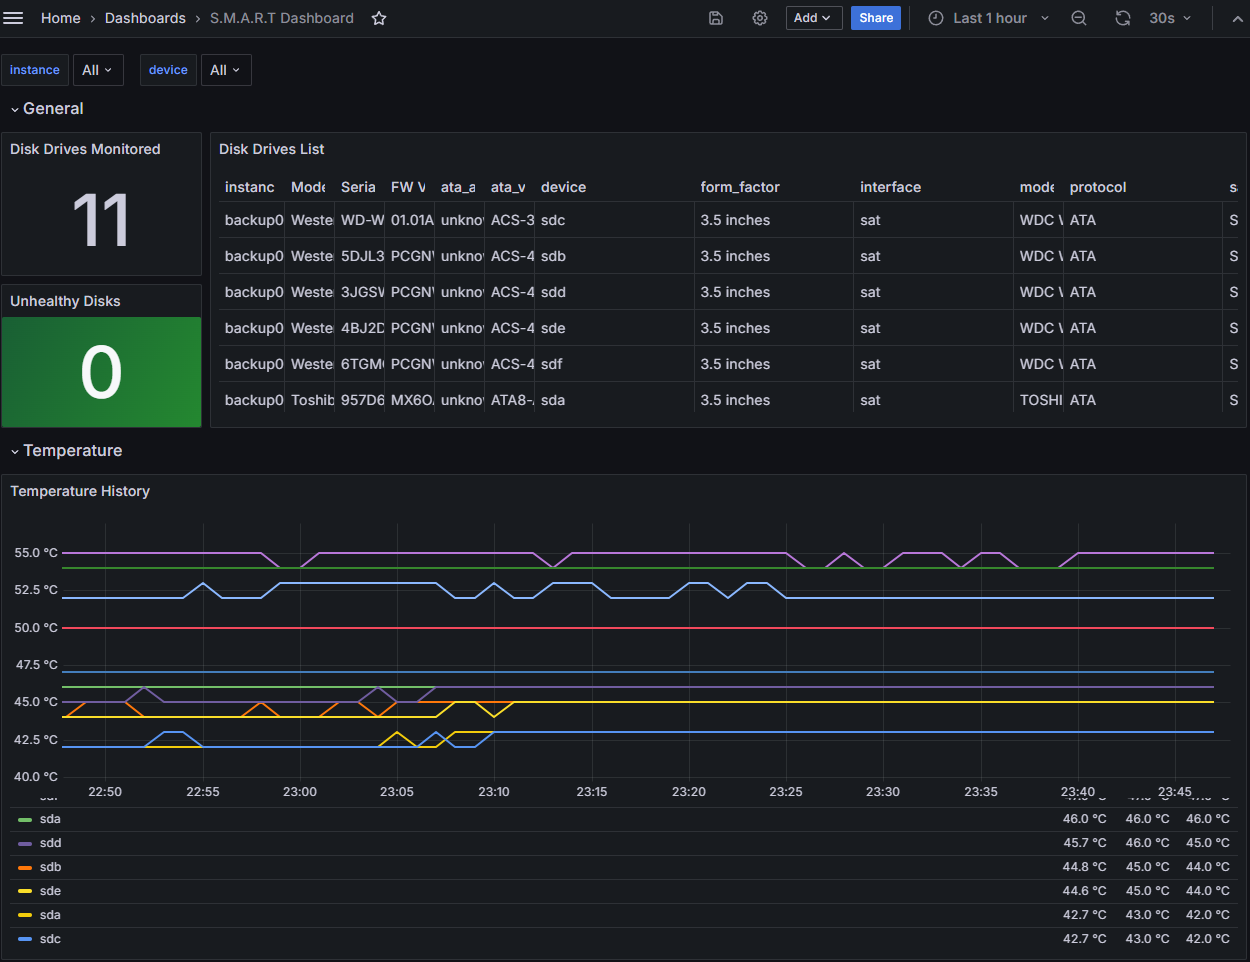
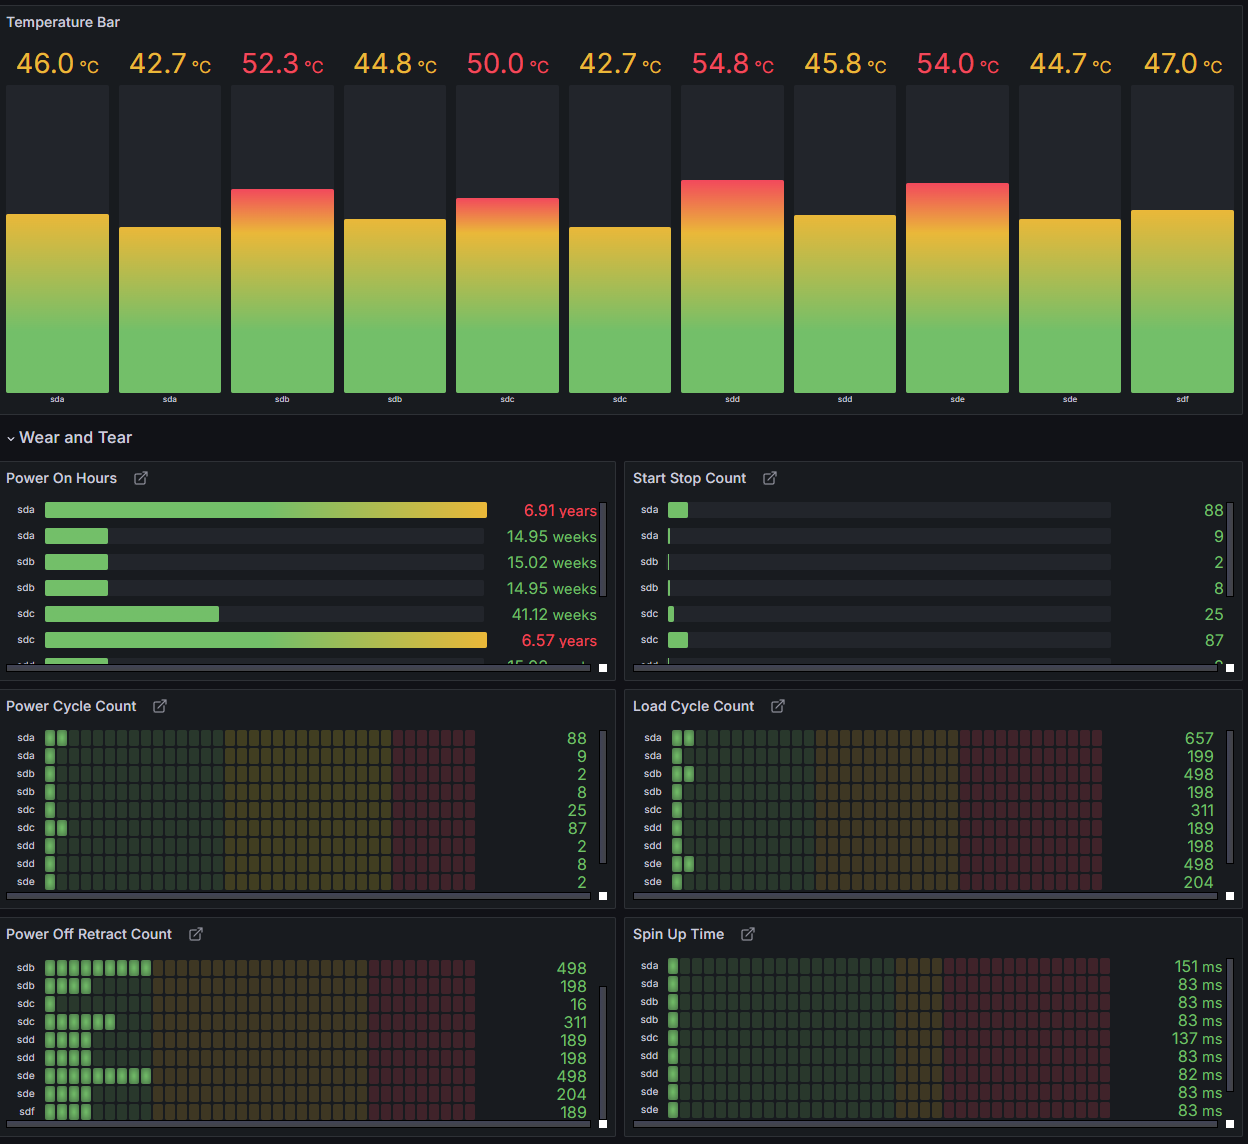
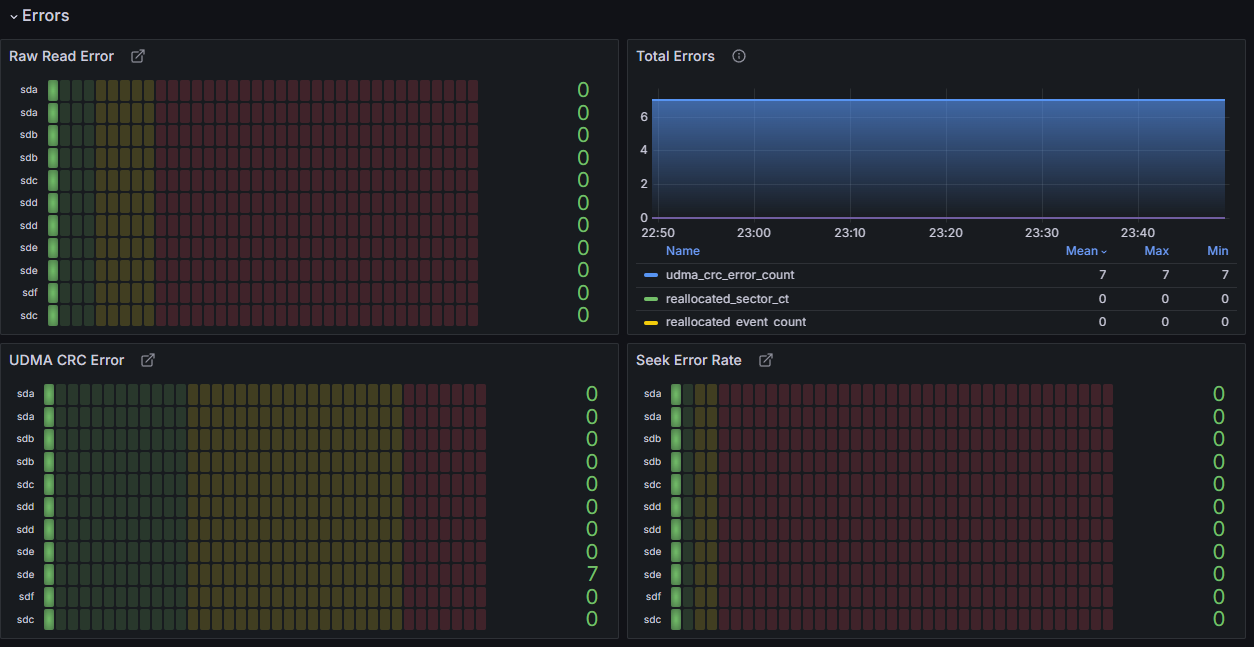
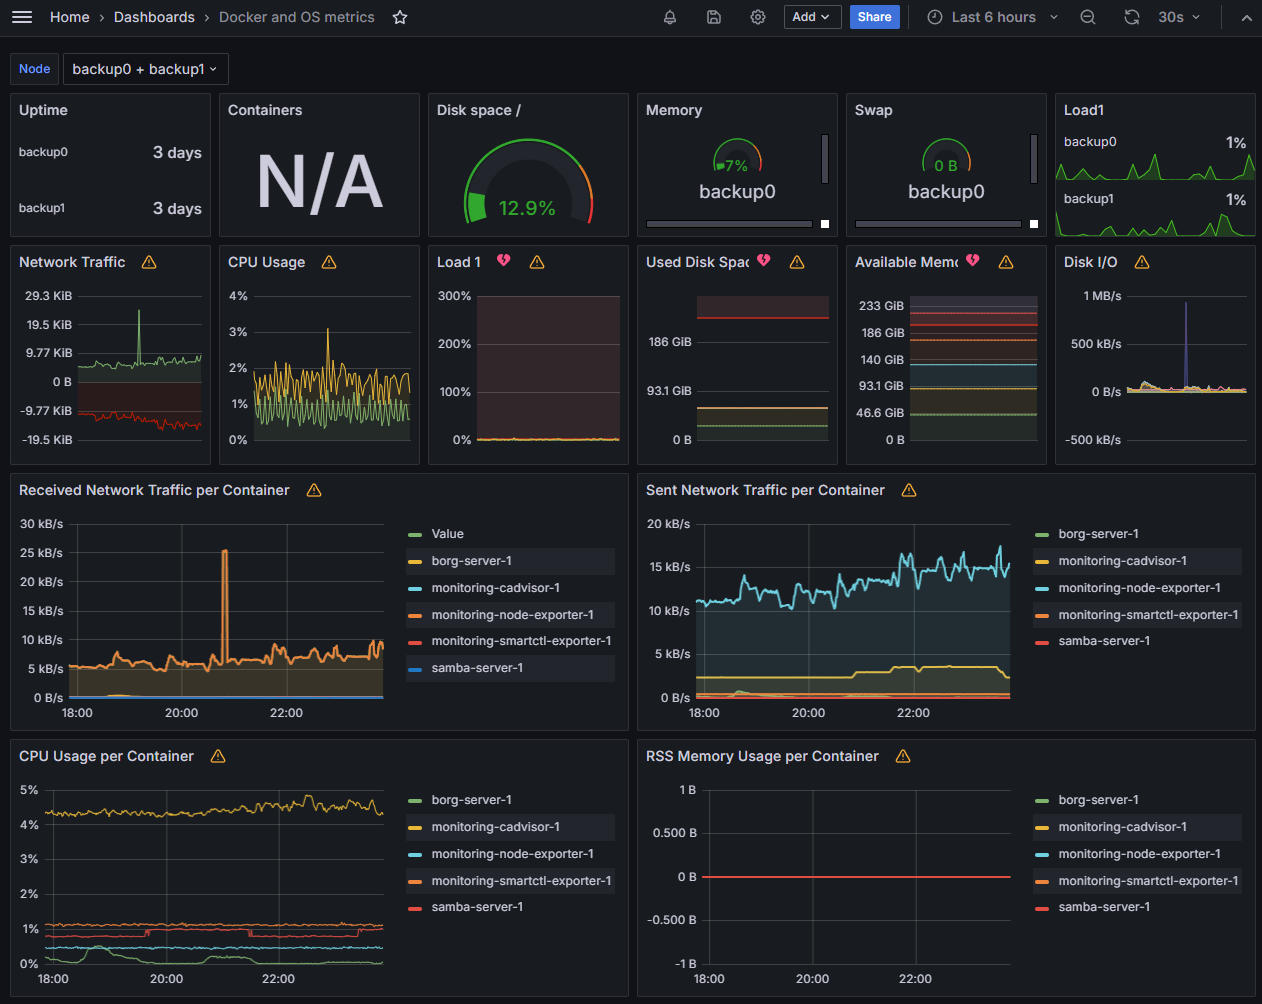
Here are some graphs from Grafana:
Networking #
I utilize ZeroTier to maintain a secure network for my devices to communicate on. You can use any method you may choose.
Acknowledgements #
There are tools available that can help with setting up syncing and replicating ZFS datasets. (see Sanoid/Syncoid). I'm a firm believer in knowing everything about your data, which is why I chose to role things on my own. This guide is to serve as an aide when it comes to choosing what is best for yourself and your data.
It's also important to note that ZFS native encryption is plagued by some pretty nasty bugs when it comes to snapshots
(particularly when using raw for snapshot send/receive). They don't always happen and are difficult to reproduce,
but you should consult the evidence
that's out there when making your decision on what method you want to use.
If you have any questions or comments, feel free to shoot me an email or message me on IRC.